Prepare for weather, hidden-site issues, and late scope changes with 5-20% contingency, schedule buffers, and written change-order rules.
Most landscaping budget blowups come from three things: weather, hidden site problems, and late scope changes.
If you want fewer surprises, your plan needs to cover risk, backup budget, extra time, contract rules, and change approvals before work starts. That matters even more in North Andover and Andover, where Zone 6b winters, spring rain, summer heat, and fall storms can delay outdoor jobs, and where older lots may hide rock, debris, drainage trouble, or utility conflicts.
Here’s the short answer:
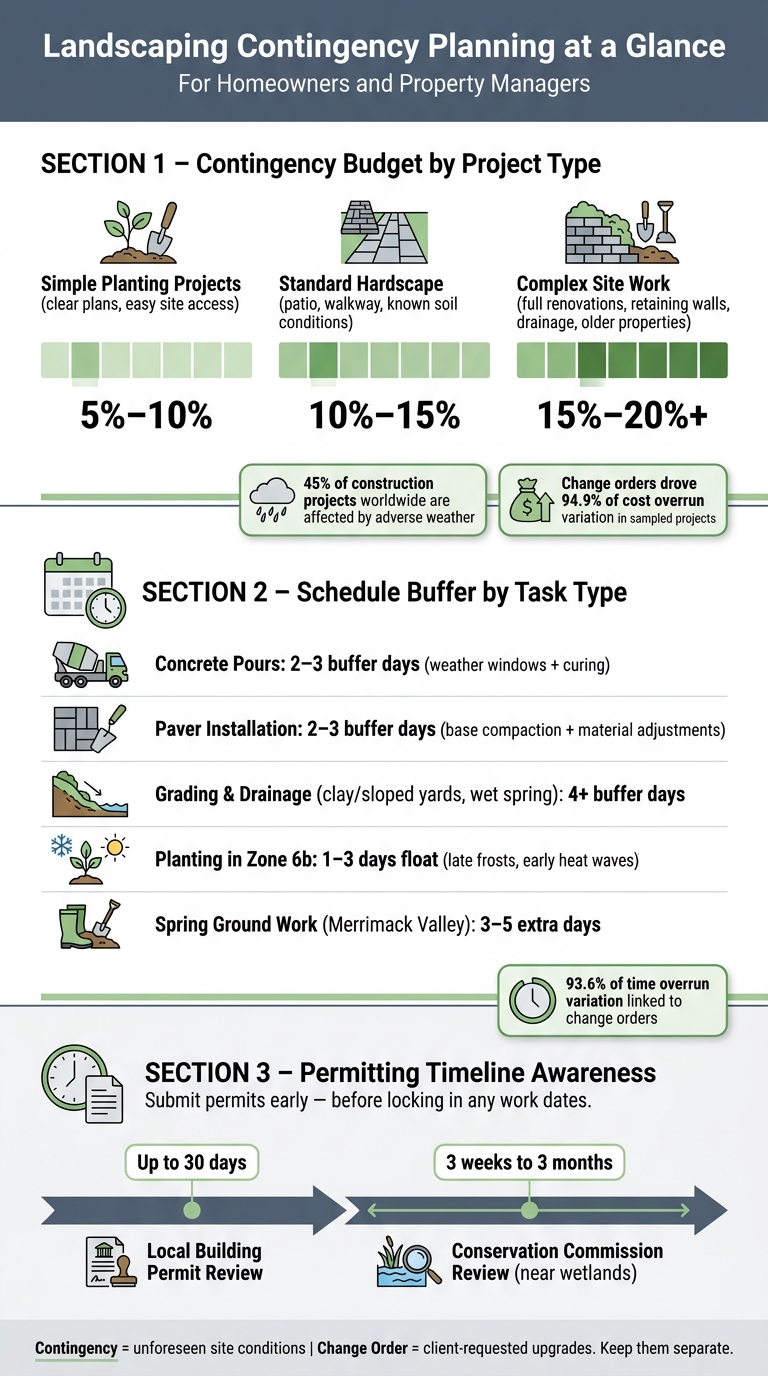
A few numbers show why this matters. Research cited in the article notes that 45% of construction projects worldwide are affected by bad weather, and one study found that change orders drove 94.9% of cost overrun variation and 93.6% of time overrun variation in sampled projects. In Massachusetts, some permits can also take up to 30 days, while conservation review can add 3 weeks to 3 months.
| Area | What your plan should cover | Typical range |
|---|---|---|
| Budget | Backup funds for hidden conditions | 5%–20%+ |
| Schedule | Float for rain, frost, inspections, and sequencing | 1–5+ days, depending on task |
| Permits | Local review before work dates are locked | Up to 30 days or more |
| Changes | Written approval before added work starts | Every time |
If your project includes planting, patios, drainage, walls, or a full yard rebuild, the goal is simple: plan for the problems most likely to happen before the crew starts digging.
Risk assessment helps you spot the issues most likely to hit cost, schedule, or performance before work starts. The goal is simple: sort risks by where they come from, then rank them by likelihood and impact.
Breaking risks into four categories keeps the process easier to handle. Each one points to a different part of the project, and any of them can drive up costs or slow the job if missed.
Site risks are usually the first place to look. These include poor drainage and standing water near foundations, slopes that need retaining walls or terracing, soft or organic soils that can’t support a patio base, shallow ledge or buried rock that adds excavation cost, and utility lines that restrict digging. On older properties, it’s smart to confirm septic and utility information before excavation begins.
Design risks show up when plans aren’t finished or the scope keeps moving. Missing grading details, unclear plant lists, or a late call to add an outdoor kitchen after materials are already ordered can all stall the project and add cost. Late design changes almost always cost more.
Execution risks come down to jobsite logistics. Tight suburban backyards may limit equipment access. Plantings should go in after heavy equipment work so they don’t get damaged. Some pavers, natural stone, and plant varieties also come with long lead times, especially during peak season.
External risks sit outside the project team’s direct control. In Massachusetts, retaining walls, drainage changes, and larger land-disturbance projects often need permits or conservation review. Municipal stormwater permits can apply to projects disturbing as little as 5,000–20,000 sq ft. HOA approval timelines for front-yard work can add weeks, and utility relocation is a major source of delay.
Once you’ve listed the risks, the next job is to rank them so you know where to put contingency dollars and schedule buffer.
A likelihood-and-impact matrix uses two basic scales:
Use a simple three-level scale for both: low, medium, or high. Multiply the scores to rank the risks, then focus contingency on the top items. It’s a plain system, but it works.
Track each risk in a risk register, which is just a table that records the risk description, category, probability, cost and schedule impact, ownership, and response plan. A few sample entries are below:
| Risk ID | Category | Description | Probability | Impact | Response |
|---|---|---|---|---|---|
| R-01 | Site | Shallow ledge under proposed patio | Medium | High | Test pits before pricing; 10% hardscape contingency |
| R-02 | External | Permitting delay for retaining wall | Medium | Schedule delay | Submit early; build schedule buffer |
| R-03 | Execution | Backordered paver material | Low | Material delay | Confirm availability before ordering |
| R-04 | Design | Scope addition (lighting) mid-project | High | Added cost and schedule impact | Formal change order required |
Review the register at five points:
New risks tend to show up as work moves along, so the register should change with the project.
Use the highest-ranked risks to set the contingency budget and schedule buffer.
North Andover and the broader Merrimack Valley sit in USDA Hardiness Zone 6b, and that shapes almost every planting and installation choice.
Late spring frosts are a common concern. Delaying installation of frost-sensitive species by one to two weeks, or picking varieties with better cold tolerance, is often the safer move. Saturated spring soils are another high-probability, high-impact risk. Installing patio base layers or planting into waterlogged ground can hurt drainage performance and make freshly built walls less stable. In cases like this, schedule buffer for excavation and base work is often more useful than adding extra money to the budget.
Summer brings a different set of problems. Drought and heat stress during installation windows can damage new sod and container plants fast. Mulch, efficient irrigation, and early-morning scheduling for heavy masonry work help cut that risk. Winter damage to borderline-hardy plants, especially in low-lying areas with poor drainage, is a medium-probability risk that can still lead to replacement costs. It’s usually smarter to choose species that are reliably rated for Zone 6b instead of pushing borderline-hardy options.
Weather isn’t a small factor in outdoor construction. Research has found that 45% of construction projects worldwide are affected by adverse weather. Planning for that in both the schedule and the contingency budget, instead of banking on a mild spring, is what keeps a project from falling into constant reaction mode. The ranked risks from this step feed straight into the budget and schedule contingency built in Step 2.
Landscaping Contingency Budget Guide: How Much to Set Aside by Project Type
Once the risks are ranked, turn them into dollars and days.
A contingency budget is money set aside for unforeseen site conditions and needed adjustments. It is not for upgrades or added scope. If something new gets added in the middle of the job, that’s a change order, not a contingency draw. Keeping those separate helps you avoid burning through reserve funds before you need them.
The right percentage depends on how much is still unknown.
Tie that percentage back to the risks from Step 1. If you already flagged likely drainage problems and unknown fill behind an old wall, a flat 10% contingency may leave you short.
Use the reserve to guard the budget. Use schedule buffers to guard the timeline.
Three methods show up most often in residential landscaping, and each one fits a different kind of job:
| Method | How it works | Best fit | Watch out for |
|---|---|---|---|
| Simple percentage | Apply a flat % to the total contract value | Standard planting and patio projects with known conditions | May over- or under-protect on sites with unusually high or low risk |
| Specific line-item reserve | Add specific dollar amounts to high-risk line items such as excavation or drainage | Retaining walls, drainage corrections, and older properties with unknown subsurface conditions | Requires detailed pre-construction site evaluation to be accurate |
| Expected value | Multiply each risk's likelihood by its potential cost | High-budget renovations or homeowners comfortable with data-driven planning | More complex to calculate; works best when the contractor has solid cost history on similar work |
For most residential jobs, contractors begin with the percentage method, then tighten it up with line-item figures after a site walk points out the trouble spots. The goal is simple: use the easiest method that still fits the level of site risk.
At this stage, ranked risks turn into two controls: money and time. The budget handles cost risk. Schedule buffers handle delay risk.
A practical schedule usually uses three types of buffers. A project-wide buffer adds a set number of days to the full project length so small delays don’t throw off the whole plan. A seasonal buffer covers higher-risk periods. In the Merrimack Valley, early spring can leave soils saturated and block equipment access, so spring projects often need 3 to 5 extra days for ground-related work that a mid-summer project may not need. A milestone buffer sits between key handoffs, like after grading and before wall or patio base work, so the crew can confirm drainage is working and the subgrade is stable enough to build on.
Not every task reacts to weather the same way. Concrete pours need dry, steady conditions and usually need 2 to 3 buffer days per pour for weather windows and curing. Paver installation has a bit more flexibility, but it still usually needs 2 to 3 days for base compaction and material adjustments. Grading and drainage work in clay-heavy or sloped yards may need 4 or more buffer days during a wet spring. Planting in Zone 6b should also carry 1 to 3 days of float because late frosts and early heat waves can throw off timing.
Permitting deserves its own lane. In Massachusetts, local building officials generally have up to 30 days to approve or deny a building permit. If a project is near wetlands or resource areas, conservation commission review may add 3 weeks to 3 months, depending on how involved the filing is. That’s not some small note at the bottom of the schedule. It means permits should be submitted as early as possible, and the review window needs to be built into the plan before any work dates are locked in. Present the schedule as a date range, not a fixed finish date.
Once cost and time are set, define who can approve changes in the field.
Once cost and schedule are set, decide who can approve field changes.
After risks, reserves, and buffers are set, the contract should spell out how the team will handle surprises in the field. That one step cuts down a lot of arguments before the first shovel hits the ground.
Start with the scope of work in plain English. Name each main item, such as lawn installation, planting beds, patios, and irrigation. Then connect those items to the drawings or to a written scope appendix. Just as important, spell out the exclusions. If ledge removal, major tree root removal, drainage redesign, or utility relocation are not part of the base price, say so clearly. That way, both sides know what crosses the line into a change.
It also helps to list allowances for uncertain items like topsoil depth or extra base gravel. Add access limits, equipment routes, and a written weather policy that defines a non-working day. These details create the baseline. If site conditions turn out to be different from what was documented, the team can point to a written record instead of arguing over who remembers what.
Those terms also make it clear when a site surprise should be treated as a contingency and when it should move into change-order territory.
Use a simple rule: unforeseen work needed to deliver the original design is a contingency; added features or upgrades are a change order. The risk register and contract scope help decide whether the issue was foreseeable or actually hidden.
Say the crew finds a buried layer of construction debris that must be removed before a patio base can be compacted the right way. That is a contingency event. The work is needed to finish the original design, and it could not have been reasonably seen during the site walk. But if a homeowner decides halfway through the job to switch from concrete pavers to natural bluestone, or wants to add a fire pit, that is a client-requested change.
Every contingency draw should be documented with photos and a short note. Every added scope item should go through a priced, approved change order before the work begins.
Research on construction projects shows why this matters. One study found that change orders accounted for 94.9% of cost overrun variation and 93.6% of time overrun variation in the sampled projects.
| Issue | True contingency | Client-requested change |
|---|---|---|
| Trigger | Unforeseen site condition, hidden obstruction | Upgrade, added feature, scope expansion |
| Funding source | Contingency reserve | Separate change order |
| Documentation | Field notes, photos, written notice | Written proposal, revised price and timeline |
| Approval required | Before using reserves beyond contract rules | Before any new work proceeds |
| Typical example | Buried debris found during excavation | Adding landscape lighting or enlarging a patio |
That rule protects the reserve for actual surprises and keeps new ideas on their own approval path.
When something shifts, tell the owner or manager the same day. Include photos and a plain-language note that explains the issue, the options, and the effect on cost and schedule. Don’t rely on a phone call alone for approval. Confirm the scope, price, schedule impact, and sign-off in writing before moving ahead.
A change-order log helps keep everything straight. Track each item's cost, status, and funding source so the team can see what came from contingency reserves and what came from added scope.
Clear records keep field decisions tied to the contract, not to fuzzy jobsite memory.
Once change control is done, closeout should show how the contingency plan actually performed. That review should shape the next project’s budget, schedule, and risk register. Compare the finished job against the original scope, estimate, and change log. Then note which contingency items came from real site problems and which ones pointed to planning gaps that could have been avoided.
That distinction matters. Was it a true contingency, or was it a scope change? The closeout review should spell out what worked, what changed, and what needs to be built into the next estimate.
Those notes then become the starting point for the next project’s risk register and contingency line.
Update the risk register after each project so local weather and site conditions stay grounded in what happened on the ground. Track which seasonal conditions delayed work so future schedules match local patterns more closely. If you gave a risk too little weight this season, it may need a higher likelihood score next time.
Weather, hidden site conditions, and approval delays should be expected. That means you need contingency, written approvals, and a clear record of field decisions.
A simple way to think about it:
Better contingencies come from better records, not bigger guesses. That holds whether you're coordinating a single installation or managing a project that spans landscaping project across multiple phases.
There’s no set rule for a landscaping contingency. Costs can shift based on permits, material supply, and weather, and those changes can affect both your timeline and your final budget.
Talking through your project scope with a professional can help you put together a more realistic budget from the start. Oliver Enterprises offers complimentary, no-obligation estimates to help define your plans and match them to practical costs early on.
A change order is a formal update to your project that documents changes to the original scope, design, or material selections after construction starts.
This usually happens when you decide to move away from the approved plan, or when site conditions force the project to take a different path.
Start the permit process once your project design and materials are locked in. If you can, plan for permits in January or February. That early start can help you sidestep spring backlogs and the stop-and-go pace of approval timelines.
It also helps to deal with zoning and permitting early, not later. Approvals can take anywhere from a few days to several weeks, especially when a project needs extra review. Getting this part moving upfront makes it easier to keep the rest of the project on schedule.