Guidance on the smallest usable outdoor kitchen: dimensions, clearances, layouts, safety rules, and cost ranges for compact patios and decks.
Yes, a small outdoor kitchen can work - but only if you can fit a grill, prep space, storage, and safe room to stand and move.
For most homes, the shortest setup that still works is about 6 feet long, 24–30 inches deep, and needs at least 42 inches of open space in front for one cook. If two people will cook at the same time, that open space should be closer to 48 inches. On tight patios and decks, the clearances matter just as much as the grill itself.
Here’s the short answer:
A compact setup can cost about $10,000–$20,000, while a larger outdoor kitchen often starts around $25,000 and can go past $50,000.
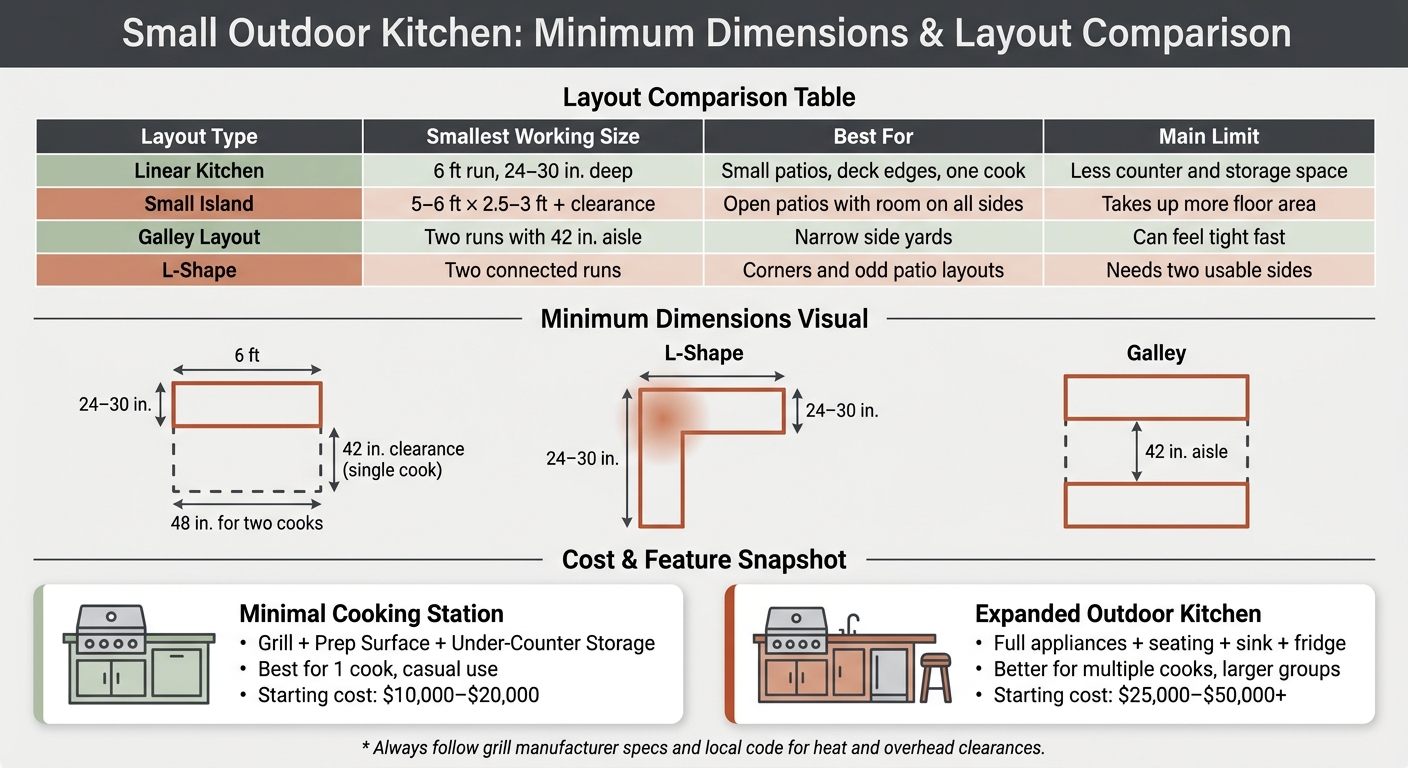
Small Outdoor Kitchen Layouts: Minimum Dimensions & Clearances at a Glance
| Setup | Smallest Working Size | Best For | Main Limit |
|---|---|---|---|
| Linear kitchen | 6 ft run, 24–30 in. deep | Small patios, deck edges, one cook | Less counter and storage space |
| Small island | 5–6 ft x 2.5–3 ft plus clearance | Open patios with room on all sides | Takes up more floor area |
| Galley layout | Two runs with 42 in. aisle | Narrow side yards | Can feel tight fast |
| L-shape | Two connected runs | Corners and odd patio layouts | Needs two usable sides |
If your layout cannot keep the grill safe and the walkway clear, the issue is not the appliance list. <u>The space itself is too small for a full outdoor kitchen.</u>
A compact outdoor kitchen only works if the grill, prep space, storage, and walking room all fit in the same footprint. Once you know the basics, the next step is simple: figure out how much space each part needs.
A good starting point is a 6-foot linear run. Match that with a 24–30-inch-deep counter and a 36-inch-high work surface, and you have a setup that feels comfortable for prep and cooking. If you're thinking about a small island, plan for about 5–6 ft by 2.5–3 ft before you even factor in clearance.
In a tight layout, the core setup is pretty straightforward: grill, landing space, prep counter, and under-counter storage. That’s the minimum that still gives you a usable cooking zone.
You’ll also want landing space on both sides of the grill for trays, tools, and food. A sink or refrigerator can be nice to have, but each one eats up more room. If square footage is limited, start with grill + prep + storage and only add more if the space can handle it.
This is where many small layouts succeed or fail. Clearance is what makes the kitchen usable, not just the cabinet sizes.
Leave at least 42 inches in front of the kitchen so one cook can stand there, open doors, and turn around without feeling boxed in. If two people will use the space at the same time on a regular basis, increase that to 48 inches.
Before building, do a quick mock-up. Tape out the 6-foot run and the 42-inch clearance zone on the patio, then go through the motions: open the grill lid, plate food, turn around, and move like you would during an actual cookout. If you keep bumping into a railing, chair, or wall, that’s your sign to shift the layout before anything gets built.
That simple test tells you fast whether a patio, deck, or corner can handle a real cooking area.
| Layout Element | Minimum Dimension | Clearance Needed |
|---|---|---|
| Linear run (length) | 6 ft | 42 in. in front (single cook) |
| Counter depth | 24–30 in. | - |
| Counter height | 36 in. | - |
| Small island footprint | 5–6 ft × 2.5–3 ft | 36–42 in. on all sides |
| Multi-cook aisle | - | 48 in. between opposing surfaces |
On a Merrimack Valley lot, a linear layout usually makes more sense because an island needs 36–42 inches of clearance on all sides. If the footprint works, the next step is choosing the compact layout that uses that space best.
The clearances around a grill and counter are what make a small outdoor kitchen safe and usable every day.
A grill can fit on a patio and still be the wrong fit for the space. The reason is simple: the grill itself isn't the only thing that needs room. The safety zone around it does too.
Grills need 15–18 inches of heat-resistant landing space on both sides for hot trays, tools, and food. Without that space, hot items end up on the nearest surface, and that's where problems start.
Combustible materials need to stay clear too — siding, wood fences, deck railings, and pergola beams. The exact spacing should follow the grill manufacturer's instructions and local code. In covered areas, overhead clearance matters just as much. A low pergola or roof directly above a grill creates a ventilation problem that no layout adjustment can fix. The cooking setup and the overhead structure need to be planned together from day one.
Oliver Enterprises builds outdoor kitchens in North Andover with those clearances worked into the layout before any surface or structure decisions get made. That's the kind of sequencing that keeps the finished hardscaping from creating a safety problem the homeowner has to work around later.
Once those safety clearances are locked in, traffic flow is the next thing that decides whether the kitchen actually works.
In a small setup, movement gets awkward fast. The biggest trouble spots usually show up around appliance doors and where the cooking zone runs into walkways or seating.
A refrigerator door that swings into the aisle is a good example. On paper, the layout may look fine. During an actual cookout, it can turn the whole space into a bottleneck.
For a single-cook setup, 42 inches of aisle width matters for exactly this reason: it gives one person enough room to stand at the grill, turn, and move around without feeling boxed in. Add a second cook, and 42 inches starts to feel tight in a hurry. Counter depth also eats into the walkway, so one sizing choice can affect everything around it.
| Clearance Type | Bare-Minimum | Recommended | Negotiable? |
|---|---|---|---|
| Grill landing space | Required on both sides | 15–18 in. | Limited flexibility |
| Separation from siding/fences | Per manufacturer/local code | Per manufacturer/local code | Non-negotiable |
| Overhead clearance (covered areas) | Per manufacturer/local code | Ventilated, code-compliant | Non-negotiable |
Combustible separation and overhead ventilation are hard limits set by manufacturer specs and Massachusetts code.
With those limits in place, the next step is picking the layout shape that can fit inside them.
Clearances set the boundaries. Layout is what makes a small space work well. On compact Merrimack Valley patios and deck corners, the shape of your setup matters just as much as the square footage. Start with the simplest footprint first, then move to a more efficient shape if your space can handle it.
A single-wall linear layout puts the grill, prep area, and storage on one counter run. It tends to work best along a patio edge or beside the house. The tradeoff is simple: you don't get much counter space.
For a small patio, especially if one person usually handles the cooking, that can work just fine. A smart way to test it is to tape out the footprint on the patio and walk through your normal routine. Go from storage to prep to the grill and see whether the flow feels smooth or a little clunky.
An L-shaped layout uses two counter runs that meet at a right angle, so it's a good fit for corner patios or spots where one straight wall won't cut it. In most cases, the grill sits on one leg while prep space and storage run along the other. You get more counter space without making the overall footprint much wider.
A galley layout uses two parallel counter runs facing each other with a corridor in the middle. It's the most efficient choice for a narrow side yard or a defined outdoor passage, since it keeps everything within easy reach for one cook. Just watch the aisle width. Keep the center aisle at 42 inches minimum. Any tighter than that, and the space starts to feel cramped.
| Layout Type | Best Use Case | Main Limitation |
|---|---|---|
| Linear (Single Wall) | Smallest footprints; along house walls or patio edges | Limited counter and storage space |
| L-Shape | Corner patios; fits most small spaces | Requires two perpendicular surfaces |
| Galley | Narrow side yards; efficient one-cook setups | Can feel cramped if the corridor is too narrow |
Use 42 inches between opposing counters for one cook. If two people will cook at the same time, go with 48 inches.
Next, match the layout to the features your space can support.
Once you’ve settled on the layout shape, use the marked footprint to see what the space can actually handle. Walk it as if the kitchen were already there. Check door swings, turning room, and any tight traffic spots. Stick with the same aisle widths already set above.
As you do that walkthrough, pay attention to site limits that can change the plan fast: slopes that send water toward the house, existing masonry that can’t be moved, or utility lines that would cost a lot to reroute. In Zone 6b, grading and drainage affect placement and help keep water off masonry and the foundation.
If the space passes that test, the next step is deciding what belongs in phase one and what can wait.
Start with the basics:
Put ventilation and electrical capacity in the must-plan-now column. Both are costly to add later.
Other features, like a sink, an under-counter refrigerator, bar seating, or extra appliances, take up more square footage and add complexity. Bring those in only if your measured space still supports the needed clearances after the core setup is accounted for.
A minimal cooking station - grill, small prep surface, and storage - makes sense when one person usually cooks and gatherings stay casual. If your usable patio area is tight but the clearances still work, a compact setup is often the smart move. You get a functional cooking zone without tearing up the surrounding hardscape.
That same test also shows when the compact route stops making sense. If you’re always working around obstacles, if two people cook at once, or if guests keep drifting into the cooking zone, the problem isn’t the appliance list. It’s the amount of usable square footage. In that case, adding patio area, adjusting grading, or using a retaining wall to reclaim sloped ground often makes more sense than squeezing the kitchen even more.
| Feature | Minimal Cooking Station | Expanded Outdoor Kitchen |
|---|---|---|
| Everyday cooking usability | Best for quick daily grilling, one cook | Better for full meal prep and multiple cooks |
| Entertaining capacity | Best for small, casual gatherings | Better for larger groups |
| Safety margin | Narrow; strict clearance discipline required | More buffer room for traffic flow |
| Hardscaping complexity | Low; often uses the existing patio footprint | Often requires patio expansion, grading, or retaining walls |
| Estimated starting cost | About $10,000–$20,000 | About $25,000–$50,000+ |
If the core clearances work, a minimal kitchen can do the job. If they don’t, expand the patio instead of forcing the layout.
Yes, but it can get complex.
Adding a sink later means tying plumbing, water supply, and drainage into an outdoor kitchen that’s already built.
That’s where things get tricky. During construction, utilities, waterproofing, and framing are usually set up in a specific order. If you retrofit a sink later, you may need to open up finished areas, adjust plumbing lines, and redo parts of the build. That can be disruptive and expensive.
If there’s even a chance you’ll want a sink down the road, it’s smart to plan for the needed rough-ins during the initial build.
Yes, a small outdoor kitchen can be safe on a deck, but it takes careful planning to keep it safe and built to last.
You’re dealing with structural framing, gas and electrical utility installation, and waterproofing. Since this is a permanent installation, those parts should be handled in the right order by licensed pros. It’s also smart to check local zoning rules and permit requirements before you start.
Expand your patio first if drainage issues, like soil erosion or standing water, could weaken a new outdoor kitchen.
It should also come first if your current layout doesn’t leave enough room for the appliances and counters you want, gets in the way of foot traffic, or needs gas and electrical lines installed in the right order so you don’t rip up finished work later.