Massachusetts paver walkways typically cost $15–$50/ft² ($900–$15,000). Price varies by size, material, base prep, drainage and site access.
In Massachusetts, you can expect a paver walkway to cost about $15 to $50 per square foot installed, with many projects landing between $3,000 and $15,000.
Your final price usually comes down to three main things: size, material, and site work. A short, straight path on flat ground will cost less than a curved front walk with drainage work, steps, or hard access. In this climate, base prep and water control matter just as much as the surface material because freeze-thaw cycles can shift and damage a walkway that is built on a weak base.
Here’s the short answer:
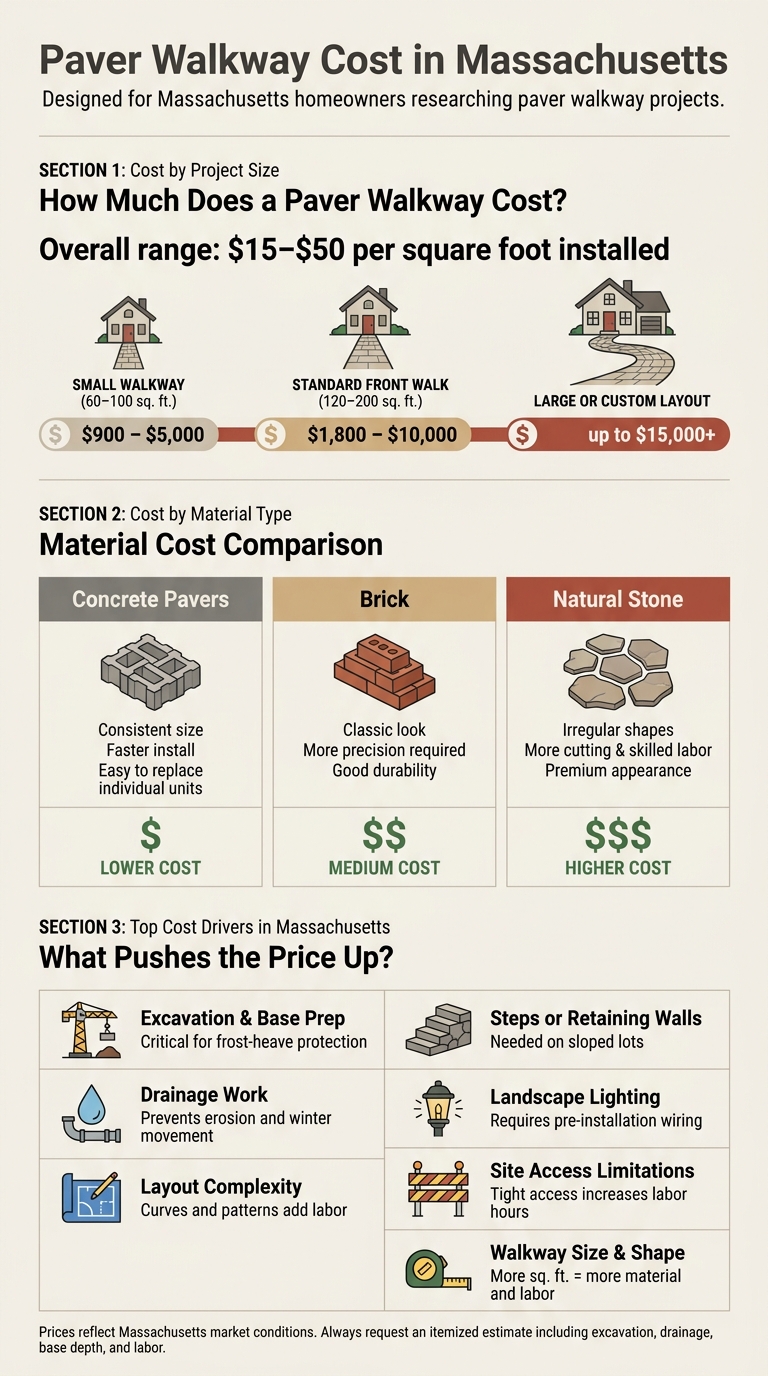
Paver Walkway Cost in Massachusetts: Materials, Sizes & Key Cost Drivers
| Item | Typical Cost Impact | What to Know |
|---|---|---|
| Walkway size | Low to high | More square footage means more material and labor |
| Layout | Medium to high | Curves and pattern work add labor |
| Concrete pavers | Lower | Faster to install and easier to replace piece by piece |
| Brick | Medium | Clean look, with more labor than basic concrete units |
| Natural stone | Higher | More cutting, fitting, and stone-setting work |
| Excavation and base prep | High | A big part of the budget in Massachusetts |
| Drainage | High | Helps limit water buildup, erosion, and winter movement |
| Steps or walls | High | Often needed on sloped yards |
| Site access | Medium to high | Tight access can increase labor time |
Before you review any quote, make sure it includes excavation, disposal, base depth, drainage, edging, labor, and cleanup - not just the surface material.
Once you have a starting price, the site itself is what pushes the project toward the low end or the high end of that range. A straight walkway across flat ground is one kind of job. A curved front entry path on a sloped lot with drainage issues is another story entirely.
Size matters, but layout matters too. Curves, custom inlays, and complex patterns add labor and call for more precise installation than a straight path.
Material choice is also one of the biggest pricing factors. Natural stone usually sits at the top end of the budget because it calls for more detailed stone-setting work and pricier materials.
A lot of the biggest price jumps, though, come from something homeowners never see once the job is done: the work below the surface.
Excavation, base prep, and drainage have a huge effect on how a walkway holds up over time. Construction starts with sitework, which includes excavation and ground preparation before any masonry begins. What sits under the pavers - excavation, base prep, and drainage - is what helps the walkway stay stable through freeze-thaw cycles.
In Massachusetts, frost heave is a serious issue. A properly built walkway needs a proper base with crushed stone, backfill, and compaction to handle seasonal ground movement. Soil conditions, demolition, and slope stability can also change the scope, even when two walkways have the same footprint. Drainage matters for more than the walkway itself. It also reduces erosion and helps protect the surrounding landscape.
Labor costs change from one property to the next. If equipment can get in easily, the work moves faster and usually costs less. If the crew has to work through a narrow side yard and carry materials by hand, labor hours go up fast, and that hits the estimate directly.
Extra features add cost too. On sloped lots, steps or retaining walls may be needed to create level, usable areas and deal with soil pressure. Lighting adds wiring and labor, and it should be planned early so the wiring can be installed before the pavers go down. Custom inlays and detailed patterns also add more labor time.
The table below shows how the main cost drivers stack up:
| Cost Driver | Why It Matters in Massachusetts |
|---|---|
| Base preparation and compaction | Helps manage seasonal movement and frost-heave risks |
| Excavation and sitework | Soil conditions, demolition, and slope stability can change the scope even on similar footprints |
| Drainage | Reduces erosion and protects the surrounding landscape |
| Layout complexity | Curves, custom inlays, and intricate patterns require more labor and precision |
| Steps or retaining walls | Needed on sloped lots to create level, usable areas and manage soil pressure |
| Landscape lighting | Adds wiring and labor; wiring should be planned before installation begins |
| Site access limitations | Limited machine access increases labor hours because materials may need to be carried by hand |
A site walkthrough is usually the fastest way to price these details with any accuracy. Material choice affects both the installation price and the upkeep that comes later.
Once excavation and drainage are in place, material choice becomes the next big budget call. Concrete pavers usually cost less than natural stone, while brick and stone push both material and labor costs higher.
Concrete pavers, brick, and natural stone land in different price tiers based on material cost, cutting time, and how hard they are to install.
That price spread affects labor too. Harder materials and tighter patterns simply take more time to install.
In Massachusetts, freeze-thaw cycles make base quality, drainage, and material durability more important than they are in milder climates. Concrete pavers hold up well against cracking when they’re installed over a proper base. They’re also fairly easy to clean, and if one gets damaged, you can replace that single unit instead of redoing the whole area.
Natural stone handles freeze-thaw conditions in different ways depending on the type. Some stones absorb more moisture and need sealing, while others are easier to live with from a maintenance standpoint. Brick falls somewhere in the middle. It offers good durability, but you’ll want to keep an eye on joint maintenance as the years go by.
So the choice isn’t just about upfront cost. It’s also about the look you want, what you can spend, and how much upkeep you’re comfortable taking on.
Those trade-offs stand out even more in small paths, standard front walks, and custom layouts.
Now that we've covered materials, let's look at how those costs play out based on project size.
Size changes the price in a pretty direct way.
Small projects in the 60–100 sq. ft. range, like a garden path or a short side-door connection, often cost about $900 to $5,000 installed. These smaller jobs usually come with a higher price per square foot. Why? Because the crew still has to handle setup, excavation, and base prep, even if the walkway itself isn't very big.
And in Massachusetts, that prep matters. Freeze-thaw cycles can be rough on walkways, so the base has to be built to hold up under those conditions no matter the project size.
A standard 120–200 sq. ft. front walkway often runs about $1,800 to $10,000 installed. That wide range usually comes down to design. A straight, simple path will land on the lower end. A layout with curves, extra width, steps, borders, drainage, or lighting can push the price up fast.
Landscape lighting can also be built into hardscaping projects to improve the finished look.
If you're planning a project, it helps to set your priorities and scope early. That way, the estimate lines up with the features you care about most. Oliver Enterprises offers complimentary estimates so you can see how each choice affects the budget.
Use these price ranges as a baseline as you move into the estimate breakdown next.
With that price range in mind, the next step is simple: read the estimate line by line.
A walkway quote shouldn't feel like a mystery. You should be able to see where the money is going and what parts of the job are pushing the total up.
A good estimate breaks out the costs so you can review each part of the job on its own.
Here are the line items that should show up in a Massachusetts walkway estimate:
| Estimate Line Item | What It Covers |
|---|---|
| Paver type and square footage | Material choice and total area |
| Excavation & Disposal | Soil removal and hauling away old materials |
| Base depth and prep | Compacted gravel and sand layers for stability |
| Edge Restraints | Borders that keep pavers from shifting over time |
| Drainage Work | Grading or pipe installation to manage water runoff |
| Steps & Masonry | Structural elements for grade changes or elevation differences |
| Lighting | Integrated landscape illumination, if included |
| Labor and delivery | Installation time and material transport |
| Cleanup and finishing | Debris removal and final site polish |
If the estimate leaves out excavation depth or drainage, ask about it before you approve anything. Those details can affect both cost and how well the walkway holds up.
Every property is a little different. That's why an on-site evaluation matters before anyone locks in the numbers.
A slope that looks minor in a photo can change the work needed. The same goes for drainage problems or soil conditions. Those issues can shift the scope in ways you won't catch over the phone.
Oliver Enterprises offers on-site evaluations and complimentary, itemized estimates for Merrimack Valley homeowners. That gives you a clearer way to line up the design with your budget before the work starts — whether the project is a paver walkway installation or part of a broader hardscaping plan.
Plan for a 6–8 inch excavated, compacted crushed gravel base. That base helps with drainage and keeps the area stable. Install it in about 3-inch compacted lifts, not all at once, and add a geotextile layer to help stop fine soil from clogging the system.
If the site already has water movement or pooling, add a perforated French drain along the edge. The grade should also slope away from the home by at least 1/4 inch per foot.
In Massachusetts, interlocking concrete pavers, granite, and bluestone tend to perform best during winter freeze-thaw cycles.
Here’s why they work so well:
That last part matters more than many people think. Even a strong stone can run into trouble if water gets trapped underneath and freezes.
Before you approve a paver walkway estimate, ask the contractor about their local experience with Massachusetts soil, terrain, and code rules. That matters more than it may seem. Soil movement, slope, and local site conditions can affect how the walkway is built and how well it holds up over time. You should also ask how they plan to deal with stormwater or runoff, especially near existing drainage lines or irrigation systems.
It’s also smart to pin down the project details in writing before any work starts. Confirm who’s handling permits, get a clear written scope, and make sure the total cost covers materials and site work. Go over the timeline too, including any possible delays tied to weather or permit approval. Then set up a final walkthrough so you can confirm the finished work matches the original plan.