Winter retaining wall checklist: check cracks/lean, clear weep holes, fix drainage, trim plants, avoid snow piles; call a pro for movement.
A retaining wall should be checked before the first hard freeze because water, ice, and poor drainage can turn small wall issues into bigger repairs over one winter.
If you own a retaining wall in North Andover or the Merrimack Valley, your fall check should focus on four things: movement, cracks, drainage, and moisture traps. The article explains what to look for, including leaning of about 1 inch per 4 feet of wall height, cracks of 1/8 inch or more, blocked weep holes, poor grading, loose caps, plant growth in joints, and water pooling near the base.
Here’s the short answer:
A few warning signs need faster action. A wall that bows outward, tilts forward, shows horizontal cracking, or has soil washing out at the base may be dealing with pressure from trapped water. In cold Massachusetts weather, that kind of problem can get worse as freeze-thaw cycles repeat.
| Area to Check | What to Look For | Action |
|---|---|---|
| Wall face | Cracks, bulging, lean, gaps | Photograph and measure changes |
| Top caps | Lifted or shifted caps | Flag for repair |
| Drainage | Blocked weep holes or dry outlets during a water test | Clear debris or schedule inspection |
| Grading | Water running toward the wall | Correct slope away from wall |
| Base of wall | Pooling water, ice, washout, voids | Repair before winter |
| Nearby landscape | Vines, roots, mulch against wall | Trim back and clear space |
The rest of the article walks through these checks in a simple order so property owners can spot trouble early and head off winter wall damage before frozen ground makes repairs harder.
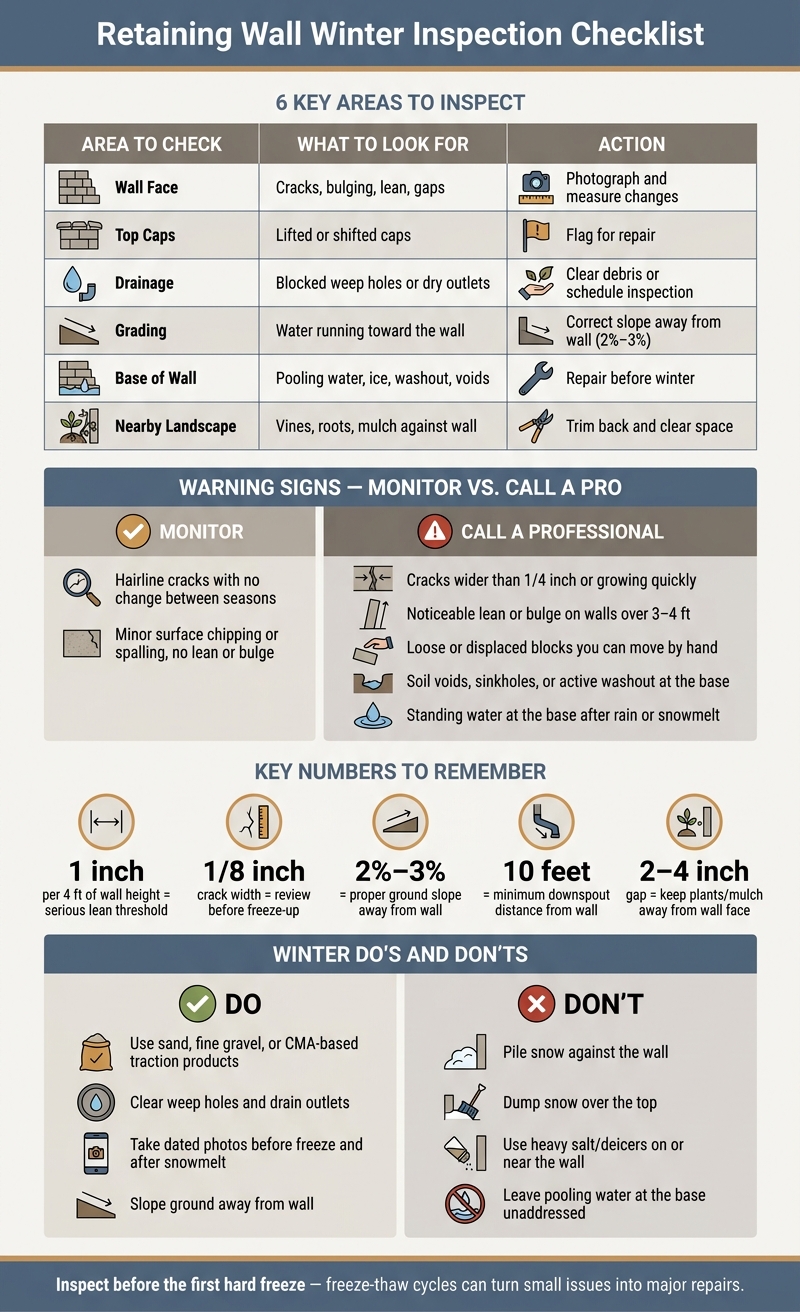
Retaining Wall Winter Inspection Checklist: Warning Signs & Actions
Now it’s time to check the wall itself for early signs of movement and stress.
Start a few steps back so you can see the wall’s full line. That wider view makes problems easier to spot. If one section bows outward, dips below the rest, or tips forward, take a closer look.
Walk along the wall and sight across the top course. You’re looking for a line that stays straight from end to end. If the wall leans forward by more than about 1 inch for every 4 feet of wall height, that’s serious.
Bulging matters too. When the face pushes outward, especially around the middle third of the wall, it often means pressure is building behind it. In many cases, the cause is saturated soil or poor drainage.
At close range, inspect the joints between blocks or stones. Look for:
Then gently tap or press individual blocks. If a unit shifts or feels loose, flag it.
Top caps need extra attention. Water and snow tend to sit there, and that can lead to trouble. If a cap has lifted, shifted, or pulled away from the course below, moisture can work deeper into the wall during winter.
Check the wall again after a heavy rain. This is often when new movement shows up.
If you spot a new crack, measure it and take a photo right away. Put a coin or tape measure in the frame so you can compare it later. Write down the crack’s location, direction, and rough length. Small hairline cracks that haven’t changed are less urgent, but any crack 1/8 inch wide or more should be reviewed before freeze-up.
Horizontal cracks deserve extra care. They often point to the wall bending under side pressure.
This is how you tell normal aging from active movement.
| Visible Warning Sign | Likely Cause |
|---|---|
| Horizontal crack in the wall face | Excess lateral earth or water pressure, often from poor drainage behind the wall |
| Stair-step crack along block joints | Uneven settlement or movement at the base |
| Bulging or outward bowing | Hydrostatic pressure from trapped water or saturated backfill |
| Leaning or forward tilt | Base rotation, soil pressure, or drainage failure |
| Loose blocks, caps, or widening gaps | Wall movement, washout of joint material, or freeze-thaw deterioration |
| White staining | Ongoing water migration through the wall |
| Soil erosion or voids near the base | Clogged drainage, failed weep holes, or grading issues |
Document anything that changes. Take photos of each problem area and note whether it has shifted since your last check. If the damage is hard to read or seems to be getting worse, schedule a professional inspection before freeze-up.
After you check for cracks or leaning, move to drainage. This part matters because trapped water behind the wall can make winter damage much worse.
Walk the entire length of the wall and clear every weep hole and drain outlet. In fall, these openings often fill with leaves, mulch, or soil. Use gloved hands or a small plastic scoop to remove debris from each opening.
Skip metal tools and pressure washers. They can damage masonry or disturb the drainage layer.
A simple test helps here: pour water at the top back of the wall and watch the outlets. You should see flow within minutes. If most outlets stay dry, the blockage is likely deeper in the drain line or backfill. At that point, it needs a professional review before freeze-up.
Clean up the base of the wall too. Rake debris away from the footing and pull mulch back a few inches from the outlets. Then look at where surface water is headed.
Surface drainage plays a big role as well. The ground should slope away from the wall by about 2% to 3%. To check it, use a 10-foot board and a level. If the board reads level or tips back toward the wall, water is likely flowing the wrong way.
Downspouts need space too. Keep them at least 10 feet from the wall. If needed, add extensions to move roof runoff toward open lawn or an existing yard drain.
If ice keeps forming at the base after rain or snowmelt, that's a red flag. The subsurface drainage may be clogged or too small for the amount of water coming through. Take dated photos and schedule repairs before the first hard freeze.
Now that drainage is clear, the next job is simple: get rid of anything that keeps moisture sitting against the wall. Cold by itself usually isn't the problem. Freeze-thaw cycles are what do the damage.
Walk the entire length of the wall and check for anything touching it, pressing on it, or growing into it. Vines on the face, shrubs leaning into blocks, and roots working into joints can hold moisture against the masonry and keep it wet between storms.
Cut vines at the soil line first. Then wait and remove them after they die back, so you don't pull stone or mortar loose.
With shrubs, prune back any branches that make direct contact with the wall. Pull mulch away too, and keep a 2- to 4-inch gap between the wall face and nearby plants or groundcover. A narrow strip of 3/8-inch to 3/4-inch crushed stone works well here. It drains fast and helps cut down on splashback.
Next, deal with a few winter habits that put water and ice right back where you don't want them.
Two winter problems cause a lot of wear: snow piled against the wall and too much deicer.
Snow stacked against the wall melts into joints and then freezes again. Over time, that cycle can slowly push blocks out of line. When you're clearing a walkway or driveway near the wall, move snow parallel to the wall and away from the edge. Don't dump it over the top or pack it against the face.
For traction near the wall, use:
Keep deicers off the wall face and out of nearby beds. After storms, sweep up extra granules so they don't sit there and wash into the area later.
If you see shallow low spots at the base, fill them with clean angular gravel. That helps stop standing water and ice from forming there.
Once you’ve finished the inspection and drainage checks, do one more thing: write down what you found and decide what needs attention before the ground freezes.
Start with a baseline set of photos before the first hard freeze. Then watch for any new movement, including cracks, lean, bulges, gaps, settlement, or washout.
Try to take photos from the same angles each time. A fence post, shrub, or other fixed landmark helps you line up the shot so changes are easier to spot. If you’re checking a crack or gap, place a ruler or tape measure next to it so the width is clear in the photo. If that crack gets wider later, note the change.
Your log should include:
Take fresh photos of the same areas after the first hard freeze, during midwinter thaws, and after major snowmelt.
Use your photos and notes to sort small issues from problems that need repair before freeze-up.
| Condition | Action |
|---|---|
| Hairline cracks, no change between seasons | Monitor with photos |
| Minor surface chipping or spalling, no lean or bulge | Monitor and reduce salt exposure |
| Cracks wider than about 1/4 in. or growing quickly | Call a professional |
| Noticeable lean or bulge, especially on walls over 3–4 ft. | Call a professional |
| Loose or displaced blocks or stones you can move by hand | Call a professional |
| Soil voids, sinkholes, or active washout at the base | Call a professional |
| Standing water at the base after rain or snowmelt | Call a professional |
Freeze-thaw cycles can make structural distress worse fast, especially when water keeps pooling at the base. That’s why a wall that looks “mostly fine” in fall can look very different by late winter.
Complete these checks before the first freeze so small problems get fixed before winter damage spreads. The sequence matters: movement first, then drainage, then debris and moisture traps. Each step builds on the last, and skipping one usually means missing the problem that causes the next.
North Andover retaining walls face a specific combination of Paxton soils, 48-inch frost depth, and freeze-thaw cycling that can accelerate wall failure when drainage is even slightly off. A wall that looks stable in October can shift significantly by March if water sat behind it all winter. That's why the inspection log, the dated photos, and the drainage test aren't optional steps.
Oliver Enterprises has worked on retaining walls and drainage systems across the Merrimack Valley long enough to know where these walls tend to fail first — and it's rarely the face stone. The problems usually start at the weep holes, the grading, or the backfill. Those are the spots this checklist is built around.
If the inspection turns up movement, standing water, or anything that's gotten worse since last season, that's the point to bring in a professional before the ground freezes. Repairs made in fall cost less and take less time than the same repairs made after a hard winter.
Inspect your retaining wall at least once during winter, ideally after a thaw. That’s often when freeze-thaw cycles start to show their hand. Look for shifting, cracks, spongy areas, or water pooling near the wall.
Then check it again after winter, usually during the March–May snowmelt period. At that point, soaked soil and drainage problems can stand out more clearly. If you notice anything off, contact a retaining wall contractor before the damage gets worse.
Yes. If a weep hole is blocked, inspect it and clear away debris or soil so water can drain and relieve pressure.
For your winter maintenance checklist, stick to safe clog removal only - do not dig into the wall system. Oliver Enterprises recommends checking weep holes and drainage outlets for debris or soil buildup to help prevent winter damage and moisture pressure behind the wall.
Calcium chloride and magnesium chloride are the safest picks near a retaining wall. They’re easier on the surface than sodium chloride, which most people know as rock salt.
Rock salt can speed up wear on concrete and natural stone. Over time, that extra stress can lead to more cracking, chipping, and surface damage.