Signs to repair or replace North Andover masonry—inspection timing, tuckpointing costs, and when movement or drainage means rebuild.
If your masonry is straight and the damage is limited, repair is often enough. If it’s leaning, shifting, or failing across large sections, replacement is usually the better call.
After a North Andover winter, you should check for cracked mortar, spalling brick, loose stones, heaved steps, chimney gaps, and wall movement. A few failed joints or one lifted tread can often be fixed. But if more than 40%–50% of joints are breaking down, or you see bowing walls, stair-step cracks across several courses, or repeated movement, patching may not last.
Here’s the short version:
Quick Comparison
| Issue | Repair may work | Replacement may be needed |
|---|---|---|
| Mortar joints | Small, isolated areas | Large sections failing |
| Brick or stone faces | Light surface damage | Heavy face loss or crumbling units |
| Steps or stoops | One raised or loose piece | Multiple treads moved out of place |
| Walls | Straight, stable, non-growing cracks | Leaning, bulging, or stair-step cracking |
| Root cause | Surface wear | Drainage or structural movement |
Your goal is simple: separate surface damage from movement. The rest of the article walks through that decision in plain terms.
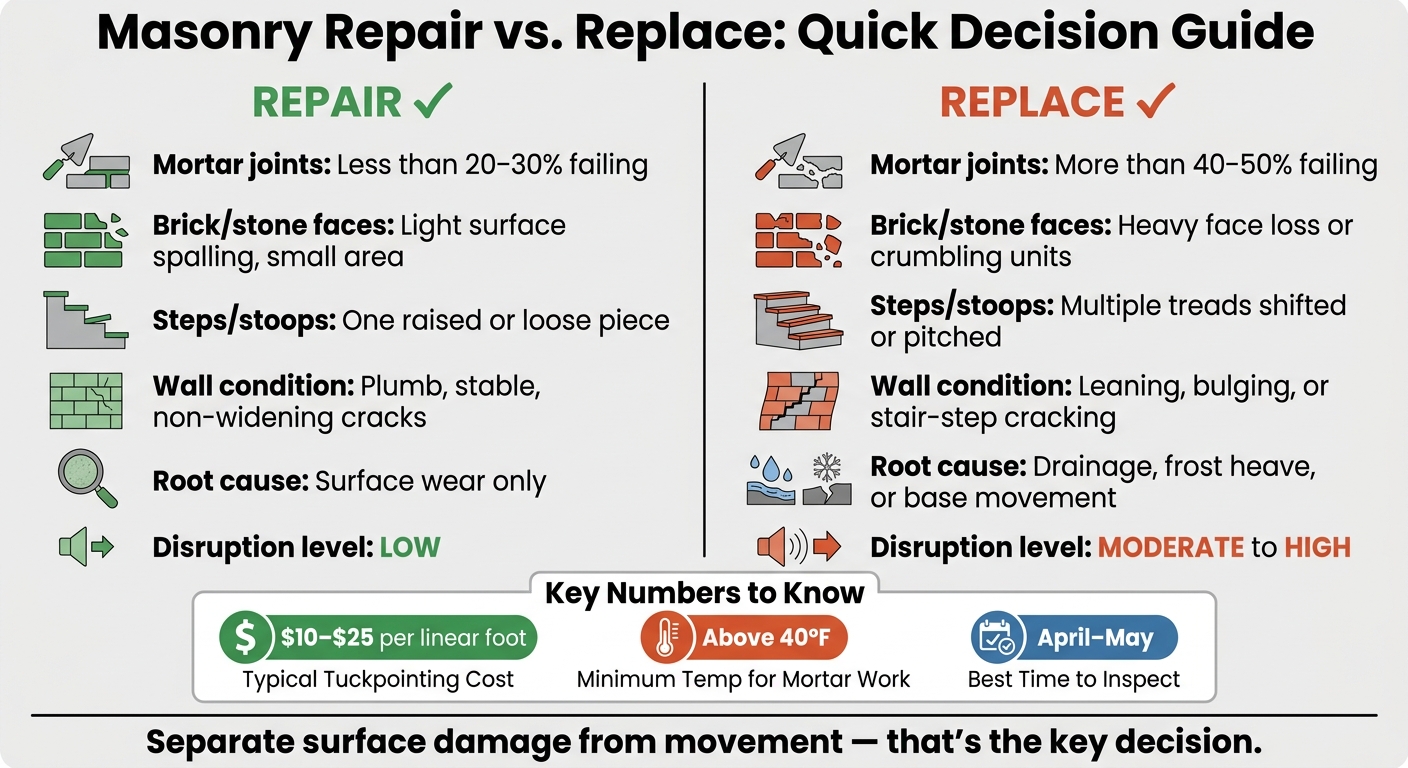
Masonry Repair vs. Replace: Quick Decision Guide for North Andover Homes
April and May are a good time to inspect masonry in North Andover after winter. Use daylight, a smartphone, and a screwdriver to check mortar, then compare each side of the property. The point is simple: figure out whether you're looking at normal wear that can be fixed or damage that suggests the structure has already shifted.
Look for patterns. Small, surface-level trouble in one spot usually points to repair. Cracks, spread-out damage, or movement across a large area usually point to replacement. Each item below helps you tell whether the issue is local or part of a bigger failure.
Different masonry surfaces fail in different ways. Here's what to look for:
| Structure | What to Look For |
|---|---|
| Brick Walls | Spalling (flaking or peeling brick faces), stair-step cracks along mortar joints, white deposits (efflorescence) |
| Stone Walls | Loose or rocking stones, crumbly mortar, sand at the base |
| Chimneys | Cracks in the chimney crown, vertical mortar cracks, sandy dust or mortar chunks on the roof below |
| Steps & Patios | Shifting stones, uneven surfaces, ponding water, gaps where the masonry meets the house |
| Foundations / Basement Walls | Horizontal cracks, vertical cracks, damp patches, or white mineral staining on interior basement walls |
If mortar crumbles or falls out when you scrape it with a screwdriver, it has failed and needs repointing.
As you walk the property, take photos of each problem and note the location (for example, "north-facing chimney base"), damage type (such as spalling, open joint, or crack), and approximate extent (for example, "roughly 3 linear feet of open mortar along the front steps"). That gives you a much clearer record when it's time to judge the scope.
Watch for whether the damage is isolated or widespread. A handful of open mortar joints in one area is very different from crumbly joints across 40% to 50% of the surface. The first case may call for targeted tuckpointing. The second usually points to full repointing.
Some signs mean a basic repair probably won't fix the root problem. Visible leaning or bulging in any wall section, loose steps, stair-step cracks across several courses, or new gaps where the chimney meets the house all suggest structural movement.
It also helps to check indoors. Sticking doors or windows, along with water stains on basement walls, can point to shifts in exterior masonry or the foundation. If you spot any of those signs, schedule a professional evaluation. The next step is to sort out whether you're dealing with local damage or a larger structural failure.
Two checks can help you make the call: how much of the masonry has failed and whether the structure has moved. After your April–May walkthrough, those answers usually make the next step pretty clear. If the structure is still straight and steady, the next thing to ask is simple: will targeted repointing hold, or are you just buying time?
Repair usually makes sense when the damage is limited and stays in one area. If crumbling mortar affects less than 20–30% of the joints, targeted tuckpointing is usually the right move. A single heaved stone tread, light spalling on a few brick faces, or a handful of recessed joints on an otherwise stable wall all fall into this bucket.
The big test is whether the wall or structure is still plumb, aligned, and stable. If it is, tuckpointing often does the job without turning the project into a full rebuild.
Replacement starts to make more sense when the structure itself has shifted. Leaning or bowing walls, stair-step cracks running across several courses, and widespread spalling all point to movement in the structure. The same goes for steps or stoops with several treads that have pitched or moved. That usually signals a larger base or drainage problem, not a one-off frost issue.
If more than 40–50% of the joints are soft, recessed, or crumbling, patching tends to delay the next round of damage instead of fixing it. Walls built without a proper base also fall into the replace camp. When that happens, it makes sense to call a stone wall contractor who can deal with both the wall itself and the drainage behind it. If movement is still active, repair is usually short-lived.
| Damage Pattern | Repair | Replace | Disruption |
|---|---|---|---|
| Mortar joints crumbling on <30% of surface | ✓ | Low | |
| Mortar joints failing on >40–50% of joints | ✓ | Moderate | |
| Minor spalling on <20% of brick or stone faces | ✓ | Low | |
| Widespread spalling or crumbling masonry units | ✓ | Moderate–High | |
| Single heaved stone or tread | ✓ | Low | |
| Multiple shifted steps or systemic stoop movement | ✓ | Moderate–High | |
| Wall is plumb with vertical, non-widening cracks | ✓ | Low | |
| Leaning, bowing, or bulging wall | ✓ | High |
Surface damage is often just the part you can see. The bigger issue is usually behind it: poor drainage, missing base support, or hydrostatic pressure pushing on the wall year after year. In North Andover's freeze-thaw climate, those are common drivers of repeat masonry failure. If water keeps pooling behind a retaining wall or sitting at the base of your front steps each winter, surface patching won't stop that cycle.
Material match matters too. Older homes often use softer lime mortar, and Portland cement can trap moisture and speed up damage. For historic properties, masonry repair needs to match the original mortar. That means the fix has to deal with drainage and mortar type, not just the cracks and crumbling you see from the sidewalk.
If a wall is still plumb and the damage is mostly in the joints, tuckpointing is often the right next move. This is a focused repair: a mason removes failed mortar to the proper depth, then repoints the joint with mortar matched to the original mix. The same kind of repair can also help with small spalls and minor chimney crown damage, as long as the brick or stone itself is still in good shape.
Tuckpointing works best when the masonry units are sound and the problem is limited to a small number of failed joints. One simple clue: if the mortar scrapes out easily, it has failed and needs professional repointing. Powdery, sand-like material collecting at the base of a wall is another warning sign that the mortar is breaking down.
For North Andover homes, tuckpointing usually costs about $10–$25 per linear foot, with prices going up for taller walls, tough-access areas, or spots with heavier damage.
Mortar match matters in Zone 6b. One of the biggest DIY mistakes is using hard modern mortar on older masonry. That can trap moisture in the wall and make freeze-thaw damage worse.
Older North Andover homes often need softer, lime-based mortars that allow moisture to move through the wall instead of getting stuck inside. Timing matters too. Mortar should cure above 40°F, so it's best to wait for a stretch of warm weather.
Surface wear can often be fixed. Movement is different. If a wall is bulging, rotating, or shifting, the structure itself has failed. At that point, patching the face won't solve the problem.
That same line applies when the issue is structural rather than cosmetic. A retaining wall that leans or moves needs to be taken down and rebuilt, with drainage corrected first. See the retaining walls page for rebuild scope.
Loose steps, shifted chimneys, and walls with widespread joint loss usually fall into the same category. When joint failure shows up across the wall, rebuilding is the right call. And if the wall keeps moving after winter, deal with the base or drainage first. Otherwise, the same problem will come right back.
For North Andover masonry rebuilds, start with masonry in North Andover. When a wall needs rebuilding, a stone wall contractor should check the base, drainage, and material match before work starts.
Do your inspection in April or May, after the ground has thawed and winter damage is visible.
Small surface issues — a few failed mortar joints, one heaved stone, minor spalling in a tight area — are worth fixing before they spread. Leaning walls, repeated movement after repairs, and widespread joint failure point to something deeper. A patch won't hold. Getting the diagnosis right is what separates a straightforward repair from a rebuild that could have been avoided.
Oliver Enterprises runs this kind of assessment regularly in North Andover, and the pattern holds: the contractors who catch wall movement early spend far less time on rebuilds than the ones who patch and wait.
Whatever work you plan, wait for a steady stretch of temperatures above 40°F before mixing or placing mortar. Mortar placed too early can freeze before it cures and fail. If the wall is still moving, stop patching and move to a rebuild.
Look for signs that the structure is shifting, not just cosmetic wear. Common warning signs include stair-step cracks along mortar joints, horizontal cracks caused by frost heave, and vertical cracks linked to settling.
Other red flags include leaning or bulging walls, doors or windows that stick, and visible gaps between a chimney and your home. If you spot any of these issues, or you’re not sure what you’re looking at, have a professional take a look.
No. Masonry repairs won’t last if the drainage problem underneath them stays the same.
If water keeps pooling near the wall or seeping into the structure, even new mortar can break down fast. You can patch cracks or do tuckpointing, but if you don’t fix the source of the water, the same damage often comes back within a season or two.
And if poor drainage is leading to leaning, bowing, or repeat movement, patchwork usually isn’t enough. At that point, a professional stone wall contractor may need to rebuild the wall or stabilize it.
No. It’s best to fix winter masonry damage in spring, ideally from mid-April through June.
If you wait until summer, moisture has more time to seep into damaged joints. And that can make the damage worse.
Spring repairs also give mortar more warm weather to cure before the next freeze-thaw cycle. That extra time can help you avoid bigger, more expensive problems.