Compare natural vs manufactured stone veneer and how to prevent moisture, meet code, and survive Massachusetts freeze-thaw weather cycles.
In Massachusetts, stone veneer lasts when the wall drains well, the mortar matches code, and the stone fits the climate.
If you’re planning stone veneer, the short answer is this: natural thin stone usually lasts longer, manufactured veneer costs less up front, and poor moisture control is what causes many failures. In this climate, freeze-thaw cycles, wind-driven rain, snowmelt, and splashback can force water behind the veneer. When that water freezes, it expands by about 9% and can put roughly 2,000 psi of pressure inside weak spots.
Before your project starts, check these points:
You’ll also want to match the wall to the job. Thin veneer works for many framed homes, columns, facades, chimneys, and foundation faces. Full-bed stone is much heavier and needs a footing. Near the coast, stainless steel lath is the safer pick because salt air can speed up corrosion.

| Option | Best fit | Typical weight | Typical installed cost | Main thing to watch |
|---|---|---|---|---|
| Natural thin stone | Long-term exterior use | 8–15 lbs./sq. ft. | $22–$60/sq. ft. | Wall drainage and bond |
| Manufactured stone veneer | Lower upfront cost | 8–12 lbs./sq. ft. | $10–$25/sq. ft. | Moisture control and fading |
| Full-bed stone | New builds with structural support | 35–45 lbs./sq. ft. | $25–$50+/sq. ft. | Footing and wall support |
The main takeaway is simple: <u>the stone you see matters less than the water control behind it</u>. The rest of the article breaks down how to choose the right material and install method for a Massachusetts home.
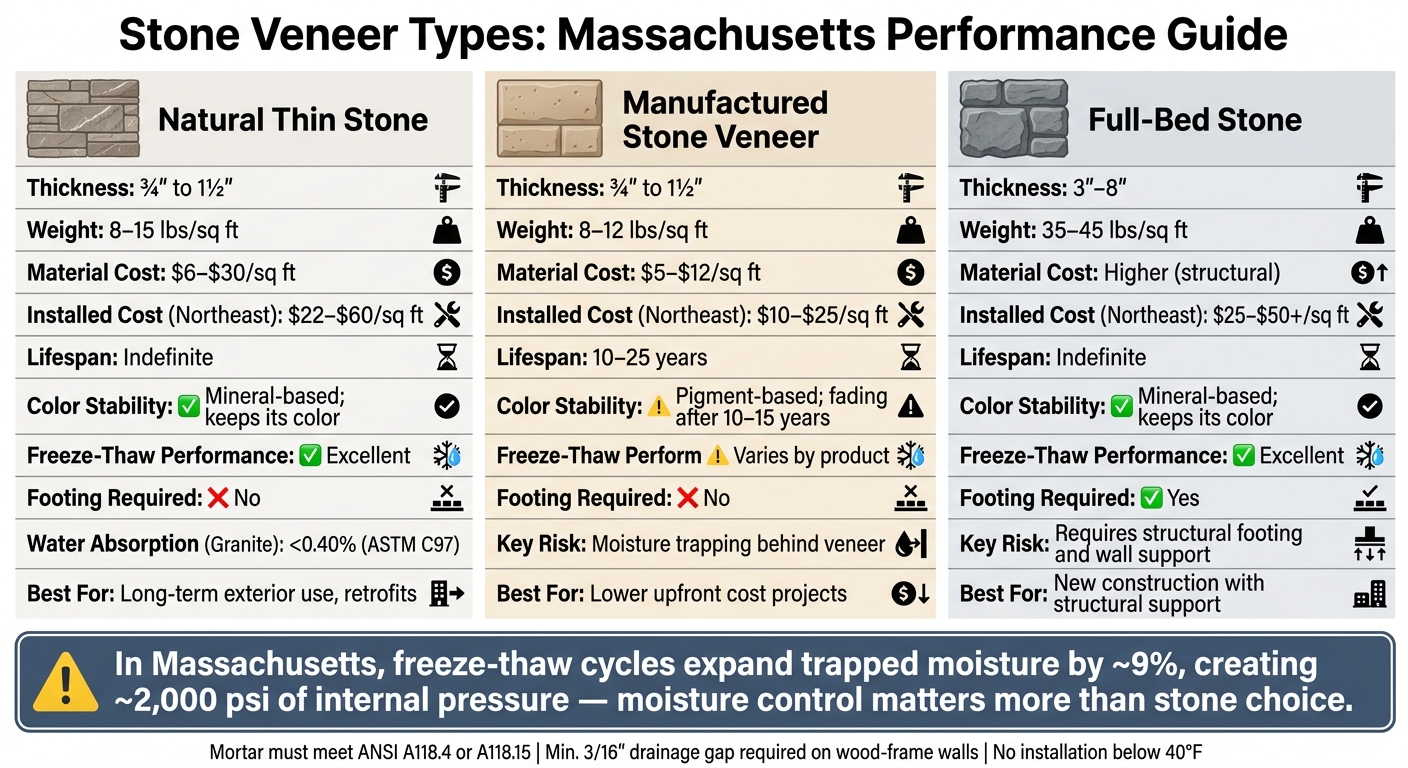
Stone Veneer Types Compared: Cost, Weight & Performance in Massachusetts
Natural thin stone and manufactured stone veneer differ most in what they're made of, how they handle moisture, and how long they tend to last.
Natural thin stone is real quarried or fieldstone cut to a thickness of ¾" to 1½". Since it comes from actual stone, every piece has its own mineral color and surface texture. It also does not UV-fade.
That matters in Massachusetts. Freeze-thaw weather can be hard on exterior walls, so low water absorption is a big plus. Granite, for example, absorbs less than 0.40% water by weight under ASTM C97, which helps reduce pressure when trapped moisture freezes and expands. And at 8–15 lbs per square foot, natural thin stone works well for retrofit projects where a full stone footing isn't practical.
On cost, natural thin stone usually runs $6–$30 per square foot for materials. In the Northeast, total installed cost is often $22–$60 per square foot.
Manufactured stone veneer, also called cultured stone, is a factory-made product cast from Portland cement, lightweight aggregates such as pumice, and iron-oxide pigments in molds made to look like natural stone. It also usually comes in ¾" to 1½" profiles.
The main tradeoff is durability. The color comes from pigment, not from the stone itself, so visible fading can show up after 10–15 years of UV exposure. Manufactured stone also relies more heavily on correct flashing and drainage. If moisture gets trapped, it can damage the wall behind the veneer.
Material costs for manufactured veneer usually fall between $5–$12 per square foot, with installed costs often landing around $10–$25 per square foot. Its service life is also shorter, at about 10–25 years.
| Feature | Natural Thin Veneer | Manufactured Stone | Full-Bed Stone |
|---|---|---|---|
| Thickness | ¾"–1½" | ¾"–1½" | 3"–8" |
| Weight | 8–15 lbs/sq ft | 8–12 lbs/sq ft | 35–45 lbs/sq ft |
| Footing Required? | No | No | Yes |
| Lifespan | Indefinite | 10–25 years | Indefinite |
| Color Stability | Mineral-based; keeps its color | Pigment-based; visible fading can appear | Mineral-based; keeps its color |
| Freeze-Thaw Performance | Excellent | Varies by product | Excellent |
| Installed Cost (Northeast) | $22–$60/sq ft | $10–$25/sq ft | $25–$50+/sq ft |
Material choice matters. But in Massachusetts winters, the attachment method often makes the bigger difference because that's what helps the wall shed water.
Once you’ve picked the stone, the next call is the one that affects performance the most: how the veneer attaches to the wall.
There are two main paths:
That split matters because each system handles weight and moisture in a different way.
Adhered veneer uses thin stone that bonds to a prepared surface. On wood-framed walls, that doesn’t mean sticking stone straight onto sheathing. The wall has to be built up in layers first.
It starts with a water-resistive barrier. Two layers give extra backup at leak points. Then comes 2.5 lb/sq yd self-furring metal lath, fastened 6 inches on-center vertically. After that, installers apply a ½-inch scratch coat and let it cure before adding the setting bed.
Mortar selection isn’t a small detail here. Under TMS 402/602-22, adopted in the 2024 IBC, plain Type S mortar is no longer code-compliant for thin veneer. The mortar now needs to be polymer-modified and meet ANSI A118.4 or A118.15.
Some surfaces allow direct bonding. On clean masonry or concrete, veneer can bond right to the substrate. But if the surface is smooth or painted, you still need lath and a scratch coat.
Clearance rules matter too. IBC §1404.11.1 requires 4 inches of clearance from earth grade and 2 inches from paved surfaces or roof shingles. At the bottom of the wall, a weep screed gives moisture a way to drain out instead of sitting behind the stone.
If the project is near the coast, stainless steel lath is the safer pick because it holds up better against salt-air corrosion.
Once the stone gets heavier than 15 lbs per square foot, mortar bond by itself isn’t enough. That’s the point where mechanically anchored systems come into play.
These assemblies need a structural ledge to carry the load, along with metal wall ties. They also need an air cavity so moisture has room to drain and dry. Think of it a lot like brick veneer: the stone isn’t just glued on, it’s supported and spaced as part of the wall system.
In practice, mechanically anchored veneer shows up more often in new construction, where the footing can be built into the project from day one. In Massachusetts, adhered thin veneer is more common for retrofits, foundations, columns, retaining wall faces, and similar residential work.
| Feature | Adhered Veneer | Mechanically Anchored |
|---|---|---|
| Weight | 8–15 lbs/sq ft | 35–45 lbs/sq ft |
| Thickness | 3/4"–1 1/2" | 3"–5" |
| Substrate | Wood-frame, CMU, concrete, brick | Concrete or CMU with structural ledge |
| Support method | Polymer-modified mortar bond | Structural footing + metal wall ties |
| Moisture control | Drainage plane/mesh; 3/16" minimum gap on wood-frame walls | Air cavity, similar to brick veneer |
| Height limit | 30 ft above grade | Governed by structural design |
| Common MA use cases | Retrofits, foundations, columns, retaining wall faces | New construction, heavy landscape walls |
| Code standard | ASTM C1242 / IBC §1404.7 | Structural masonry codes |
Massachusetts code also requires a minimum 3/16-inch drainage gap behind thin veneer on wood-frame walls. Drainage mesh helps hold that gap in place. That space may look small, but it does an important job: it gives trapped moisture a path out before freeze-thaw weather turns it into a problem.
Those details shape how the veneer stands up to Massachusetts winters.
Once you’ve settled on the attachment method, winter performance mostly comes down to one thing: how well the wall gets rid of water.
Massachusetts winters bring repeated freeze-thaw cycles. When moisture gets trapped behind the veneer or inside it, that water freezes, expands by about 9%, and creates roughly 2,000 psi of internal pressure. That pressure can crack porous stone, weaken the bond, or, over time, push pieces off the wall. In a lot of cases, the veneer itself isn’t the main issue. The bigger problem is the moisture control behind it.
The drainage gap, flashing, weep screeds, clearances, and moisture barrier need to work as a system. Their job is simple: move water out of the wall instead of letting it sit there. If even one of those parts is missing or installed the wrong way, freeze-thaw weather can turn that weak spot into damage.
Cold-weather timing matters too. Stop installation below 40°F because polymer-modified mortars need that temperature to cure the right way. Adhered veneer also needs at least 50 psi bond strength.
After moisture control, the next big call is structural load.
Thin veneer, whether natural or manufactured, is light enough for standard wood-frame walls and does not need a footing. Full-thickness stone is different. At 35–45 lbs/sq ft, it acts as a structural material and needs a footing designed for that load.
Moisture exposure also matters here. Natural stone with low water absorption tends to perform well in Massachusetts freeze-thaw conditions. Manufactured stone can absorb much more water, which makes flashing and drainage even more important.
Before any stone goes up, check the wall and the drainage path. That step can save a lot of trouble later.
Once you get past the material and installation choices, the main point is simple: veneer performs only as well as the wall behind it. Stone veneer is a finish layer, not the structure itself. Long-term performance comes down to the wall assembly and the way it's installed.
Material choice still matters, but moisture control matters more. Natural thin stone tends to hold its color better over time, while manufactured veneer can cut upfront cost but leans more heavily on proper flashing and drainage.
In Massachusetts, freeze-thaw cycling puts extra pressure on the small details. Drainage, flashing, clearances, and mortar selection need to be treated as core parts of the system, not afterthoughts. Oliver Enterprises approaches stone veneer and masonry work in North Andover with that system-first order, starting with substrate and drainage before any style decisions get made.
The first question isn't stone style. It's whether the wall can carry thin veneer or needs a full-thickness stone assembly. Thin veneer works with standard framed walls. Full-bed stone needs a footing and structural support.
Get the substrate, drainage path, and climate right first, and veneer can last for decades.
Check that the wall is structurally sound and shows no signs of wear, damage, or failure.
Thin veneer fits a lot of residential spaces, both inside and outside, because it has a lightweight profile.
Indoors, people often use it for fireplace surrounds, accent walls, kitchen backsplashes, islands, and basement bar or entertainment areas.
Outdoors, it’s common on facades, entryways, garage exteriors, columns, chimneys, foundations, outdoor kitchens, and retaining walls.
And because it doesn’t need structural footings, it works especially well for retrofitting existing structures.
Before a stone veneer project starts in Massachusetts, ask the contractor one thing right away: how will they manage moisture in freeze-thaw weather?
That matters more than many homeowners think. If water gets trapped behind the veneer, winter can be rough on the wall system. Water freezes, expands, and puts stress on the materials. Over time, that can lead to cracking, staining, or loose sections.
Ask them to confirm a few specific details:
If a contractor gives vague answers here, that’s a red flag. You want a clear plan, not guesswork.